Mount SFTP over SOCKS Proxy in OSX with Cyberduck

I can only access certain servers at work over SSH if I am using a machine with a certain static IP address. I wanted to be able to mount the servers file space using SFTP on a Macbook Air when I am either at home or at  a remote location. I investigated a lot of different ways to accomplish this with little success. After a lot of trial and error I was able to create a Socks proxy to my work machine using ssh and then mount the server file systems by using Cyberduck and enabling the use of the socks proxy.

Network Diagram
Network Diagram

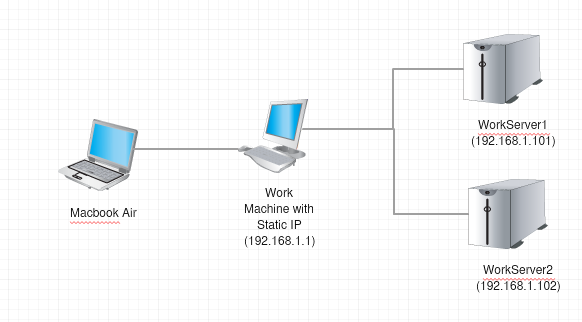
First, I needed to create the socks proxy. In order to do this I had to SSH into my work machine and dynamical forward a port 8080. You may forward any port that is not being used greater than 1024. This will send any traffic on that port through the tunnel and out of the machine that you are connected to.

ssh [email protected] -D8080

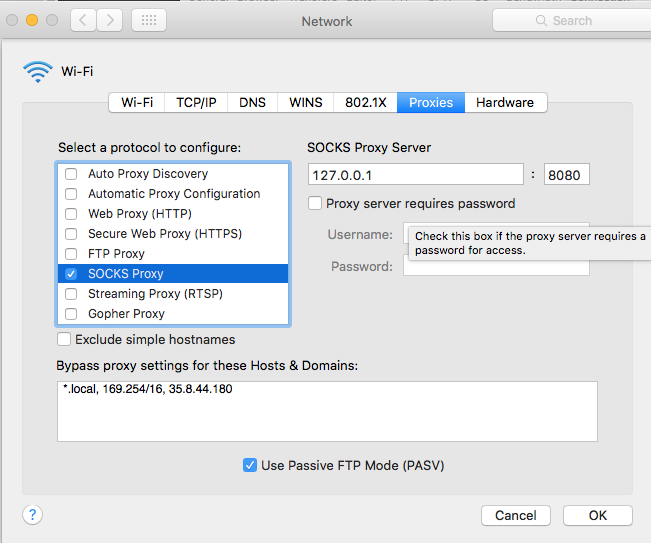
After I have created the SSH connection with the dynamic port forwarding, I enabled the socks proxy in OSX Network Preferences -> Advanced -> Proxies. Check the “SOCKS Proxy” box. Then, set the “SOCKS Proxy Server” to 127.0.0.1:8080. Finally, add the IP or Domain of the machine that has the SSH connection to the “Bypass proxy settings for these Hosts & Domains” box.

OSX Socks proxy settings
OSX SOCKS Proxy Settings

Now enable the proxy in Cyberduck. Go to “Cyberduck” -> “System Preferences” -> “Connection” and check the box that says “Use system proxy settings”.

Cyberduck system preferences for proxies

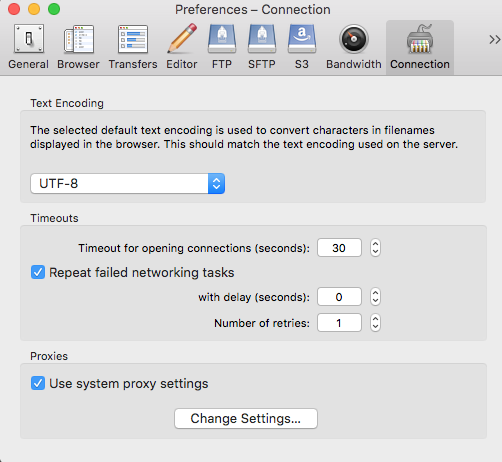
Now every connection in Cyberduck will flow through your SOCKS proxy that you set up so you can mount the remote server file system over SFTP.

MAME Bar Top Aracade Cabinet

Introduction

Update: Check out this Instructable –Legend of Zelda Bartop Arcade Cabinet

In an old episode on Hak5, Wess Tobler (@Dankiswess) did segment on making a MAME bar top arcade cabinet. This segment inspired me to make my own MAME (Multiple Arcade Machine Emulator) arcade cabinet, so I began doing research on different MAME cabinet designs. Bartop Arcade had many different designs and templates for bar top arcades. Below is the design and template that I based my MAME cabinet off of.

Build Phase

Items need for the build phase:

For the build phase I used the template that I found from Bartop Arcade and cut out each piece. I decided against having a slide out drawer, so I had to make some slight modifications. Below is a picture of the cabinet about 90% into the build phase.

After cutting and assembling the exterior of the cabinet, I had to wire all the buttons. Once that was done it was onto the software configuration.

Software Configuration

A lot of research went into deciding exactly how the software side of this project would be configured. I was initially set on using MALA as my front-end, but then I found Hyperspin.

Not only was Hyperspin a superior looking front-end, it would allow me to run many different emulators including a NES and SNES emulator. Hyperspin does most of its configuration through GUIs and XML files. Below is a image of the cabinet 90% complete running PAC-MAN.

Hyperspin also allowed for configuring other applications to open from within it. I configured it to run Aussie Juke as one of the emulators. Also, after reading a comment by Moonlit on episode five of TheNewTech.tv, I decided to modify the registry entry for explorer.exe to boot to Hyperspin.
HKEY_Current_User\Software\Microsoft\Windows NT\CurrentVersion\Winlogon\Shell

Final Thoughts

There are several things I have to do to complete this project. First, I need to finish the marquee. The marquee will end up being a Cylon eye covered by a tinted plexiglass. Second, I need to mount the PC hardware inside the cabinet.